Breakout Rooms
Breakout Rooms
- Breakout rooms enabled in your meeting settings
- Creating, removing, and renaming breakout rooms after launch
- Zoom desktop client
- Windows: 5.11.4 or higher
- macOS: 5.11.4 or higher
- Linux: 5.11.4 or higher
- Zoom desktop client
- Saving breakout rooms for future use
- Zoom desktop client
- Windows: 5.11.4 or higher
- macOS: 5.11.4 or higher
- Zoom desktop client
- Viewing activity statuses of participants in breakout rooms
- Zoom desktop client
- Windows: 5.11.4 or higher
- macOS: 5.11.4 or higher
- Linux: 5.11.4 or higher
- Zoom desktop client
By default, only the host or co-host can assign participants to breakout rooms. They can choose to allow participants to choose their own room, but this must be done in the meeting when launching the breakout rooms.
Zoom Breakout Rooms Limitations Host vs Co-Host Host Co-Host Assigning*, starting, and ending breakout rooms ✔ ✔ Move between breakout rooms ✔ ✔ Broadcast message to all ✔ ✔ Notified of Requests for Help ✔ View activity statuses of participants ✔ ✔
Users joined into the Zoom meeting from the Zoom Mobile App or H.323/SIP devices can participate in breakout rooms, but cannot manage them.
If the meeting is being cloud recorded, it will only record the main room, regardless of what room the meeting host is in. If local recording is being used, it will record the room the participant who is recording is in. Multiple participants can record locally.
You can create up to 50 breakout rooms. The maximum number of participants in a single breakout room depends on the meeting capacity, number of breakout rooms created, and if participants are assigned during the meeting or before the meeting.
- You can only pre-assign participants that have a Zoom account (internal or external Zoom users).
- To pre-assign participants that are external Zoom users, import a CSV file.
- Up to 200 participants can be pre-assigned to breakout rooms. If you have the Large Meeting add-on, this can be increased to a maximum of 500 pre-assigned participants.
- If you scheduled recurring meetings, the pre-assigned breakout rooms will only work if it's applied to all meetings in the recurrence. You can't edit a single meeting in the recurrence and apply a unique pre-assignment.
- Please login to your Zoom account at https://unm.zoom.us/ .
- In the navigation menu, click Settings.
- Navigate to the Breakout Room option on the Meeting tab and verify that the setting is enabled.
If the setting is disabled, click the toggle to enable it. If a verification dialog displays, choose Turn On to verify the change.
- Sign in to the Zoom web portal.
- Click Meetings and schedule a meeting.
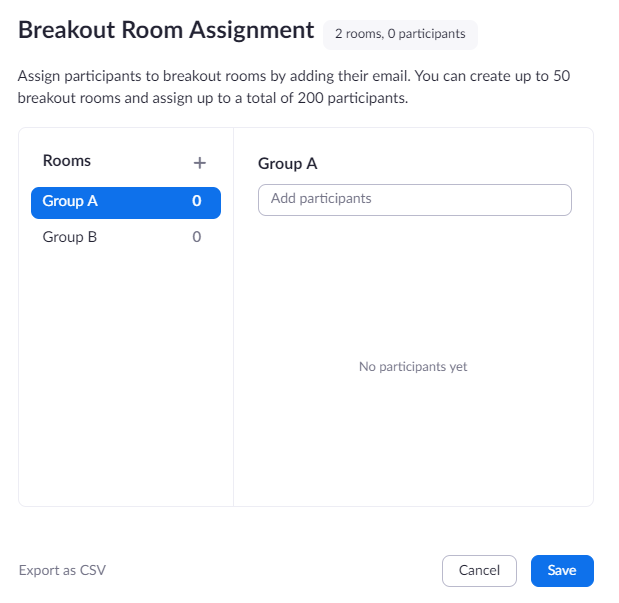
- In the Meeting Options section, select Breakout Room pre-assign and click Create Rooms.

- Click the plus icon beside Rooms to add breakout rooms.

- Hover over the default breakout room name and click the pencil icon to rename it.

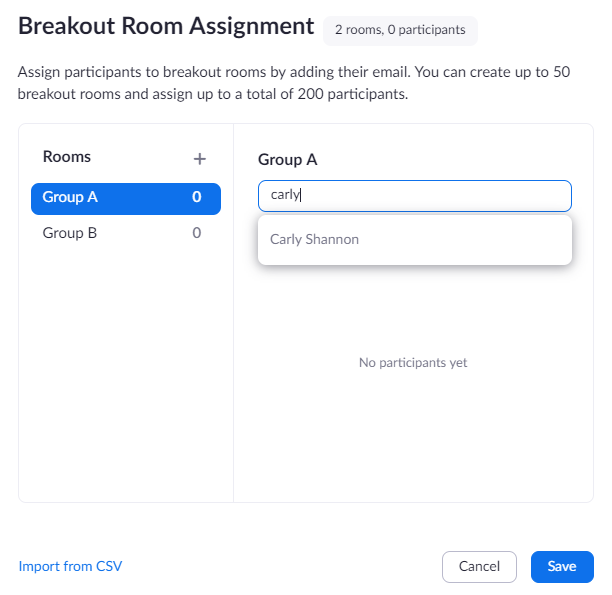
- In the Add participants text box, search for participants' name or email address to add them to the breakout room.
Note: You can add internal Zoom users that are in the same account. To pre-assign participants that are external Zoom users, import a CSV file.
- (Optional) Use these options to edit your breakout rooms and participants:
- Click and drag a participant's email address to change the order.
- Hover over a participant's name to see options to move them to another room or remove them from the current room.
- To delete a breakout room, hover the room name in the left panel and click the trash bin icon.
- Click Save.
- Sign in to the Zoom web portal.
- Click Meetings and schedule a meeting.
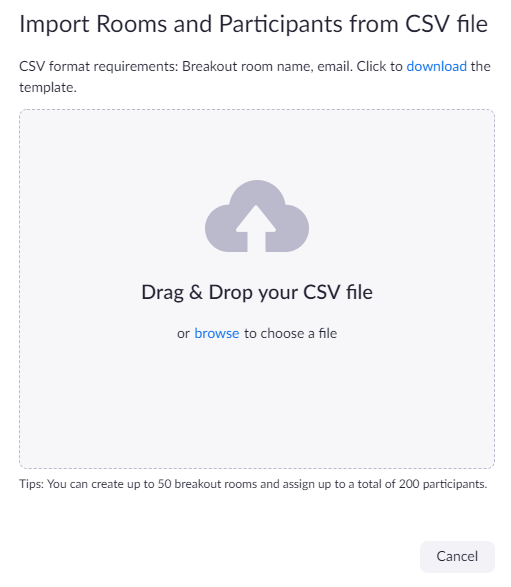
- In the Meeting Options section, select Breakout Room pre-assign and click Import from CSV.
- Click download to download a sample CSV file you can fill out.

- Open the CSV file with spreadsheet software like Microsoft Excel.
Note: You can specify internal or external Zoom users. - Fill in the Pre-assign Room Name column with the breakout room name, and the Email Address column with the assigned participant's email address.
- Save the file.
- Drag and drop the file in the web portal.
Zoom will verify that the email address has a Zoom account.
If you have already pre-assigned participants to breakouts rooms, you can edit the assignments before you start the meeting.
Note: You can also manage breakout rooms during the meeting.
- Sign in to the Zoom web portal.
- Click Meetings and click the meeting you want to edit.
- In the Breakout Room section, click View detail.
- Edit the breakout rooms as needed. See the previous section for more details.
- Click Save.
- Start the meeting with participants pre-assigned to breakout rooms.
- Click Breakout Rooms in the meeting controls to access the breakout rooms you created.

Note:- If a participant is not automatically assigned to the breakout room you specified when scheduling the meeting, recover to pre-assigned breakout rooms to re-assign participants to their pre-assigned breakout rooms.
- You can manually assign participants using the in-meeting breakout room controls.
- Click Open All Rooms to start the breakout rooms.
Recovering to pre-assigned breakout rooms
After starting the breakout rooms, you can recover to the breakout rooms assignment you previously specified. This can be useful if you changed your breakout rooms during the meeting, or pre-assigned participants have joined the meeting after you joined the meeting or started breakout rooms.
- Start the meeting with participants pre-assigned to breakout rooms.
- Click Close All Rooms to end all breakout rooms.
- Click Recreate then Recover to pre-assigned rooms.

Participants will be re-organized into the breakout rooms you specified when scheduling the meeting.
Learn more about managing breakout rooms.
Alternatively, you can create the meeting at https://unm.zoom.us/, configure the Breakout Room pre-assignments, then import the meeting into your Canvas Course.

